Showing posts with label dessert. Show all posts

Saturday, December 6, 2014

Salted Chocolate Chip Cookies


Salted chocolate chip cookies from BeyondUmami
The above picture represents the end result of me baking three different batches of salted chocolate chip cookies over a period of a week. Yes one week! Thankfully we didn't eat them all ourselves as we had people over for dinner and I dutifully brought them with me to potlucks, work meetings and get-togethers. Back in November, I was on a search for a chewy salted chocolate chip cookie that has a slightly crispy outside.  

Two different cookies, two different recipes.
I tried various butter to sugar ratios, different sugar amounts, sugar-butter whipping methods, baking soda vs. baking powder and even baking times. I charted everything! 


Flour to butter ratio and rising element were the main differences in these two cookies.
The one on the right was almost cake like due to the large amount of flour, while my current recipe (left) gave me what I was looking for - crispy outside & chewy insides. 
The recipe of the cookie that I am most happy with is depicted visually step-by-step below. Let me know in the comments below if you have a particular chocolate chip cookie that you enjoy and why.

Beyond Umami's Chewy Salted Chocolate Chip Cookies

Ingredients
  • 1/2 cup butter
  • 1/4 cup white sugar
  • 1/4 cup turbinado sugar
  • 1/2 cup packed brown sugar 
  • 1 1/2 cups flour
  • 1 teaspoon baking soda
  • 1 teaspoon of salt 
  • 1 egg
  • 1 teaspoon vanilla extract
  • 1 cup chocolate chip or chocolate chunks chopped
  • good quality salt for topping


Directions:
  1. Measure all the ingredients. Combine white sugar, turbinado sugar and brown sugar together. In a separate bowl combine flour, baking soda and salt together.
  2. Place butter and sugars into the bowl of a standup mixer with the paddle attachment.
  3. Cream butter and sugars together on medium-high speed for 10 minutes. It should look very fluffy.
  4. Add in the egg and continue mixing with the paddle attachment. Once the egg is incorporated, add in the vanilla extract.
  5. Slowly add in the flour, baking soda, salt mixture with the standup mixer running on low. Once all the flour is in the mixer turn the mixer back up to medium (~6)
  6. This is what the cookie batter should look like.
  7. Turn the mixer off and remove from stand. Fold in the chocolate chips or chocolate chunks with a spatula.
  8. Once all the chocolate is mixed into the dough, measure out 20g balls of dough with a scale. This helps to make consistent size cookies that will all bake at the same time. Flatten each ball of dough onto a lined cookie sheet. Top with a good quality salt. In the picture below I used pyramid salt crystals.

    Bake at 375F for 12-13 minutes. They should be slightly browned on the outside and slightly chewy on the inside. Transfer to a baking rack to cool or pop one into your mouth for immediate taste testing.
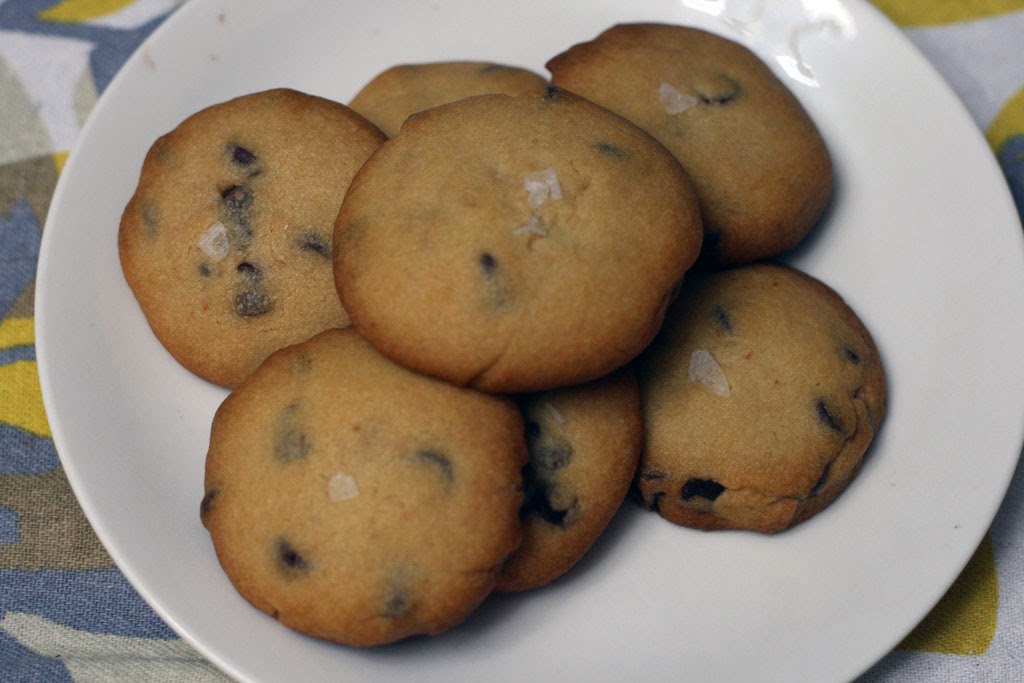
Let me know if you try making them and what you like in a good cookie. 

Thursday, October 2, 2014

Aubergine (Mock Apple) Crisp Recipe with Oats


aubergine eggplants masquerading as apples on Beyondumami's blog
Ever since we tried the brilliant "aubergine tart" at Teatro my husband, Danprime and I were inspired to do create something similar. The aubergine tart tasted like an apple pie but instead of being made of apples it was made with eggplant! After doing some research we found that this type of tart is referred to as a "mock apple pie". Typically, these recipes involve strange ingredients like zucchini or even soda crackers but there were none that used eggplant.

The key to making good mock apple pie is to not over cook the eggplant and to only use the firmest parts. Sprinkling salt over the slices will draw out the moisture and some of the bitterness associated with overcooked eggplants.

Aubergine (Mock Apple) Crisp Recipe with Quick Oats

Ingredients
  • 2 Medium-Large Firm Eggplants 
  • 3 Tbsp of Lemon Juice
  • 3/4 Cup of Brown Sugar
  • 2 tsp of ground Cinnamon
  • 1 tsp of ground Cloves
  • 1.5 tsp of Cream of Tartar
  • 1/2 Cup of water
  • 2 Cups of Quick Oats
  • 1/2 Cup of Melted Butter
  • 1/2 Cup of Brown Sugar
Equipment
  • 1 Large Baking Pan
Directions
  1. Peel the skin off the eggplants.
  2. Cut each eggplant into 2 cm or 0.5 inch slices. Ensure that you have cut away the seed and "soft" flesh from the inside of each slice of eggplant in order to only use the very firm parts of eggplant. Sprinkle the slices with salt. 
    Wait 30-40 minutes for the eggplant slices to "sweat" water (this process helps to remove some of the bitterness found with eggplants).
  3. Mix 3/4 cup of brown sugar, cinnamon, cloves, cream of Tartar together in a separate bowl. Set aside. 
  4. With a paper towel, wipe the moisture off the eggplant slices.
  5. (Optional) Set aside half a cup of the firmest parts of the eggplant slices.
  6. Cut the other eggplant pieces into "apple-like" chunks and slices. Then mix 3 tbps of lemon juice into the eggplant pieces.
  7. Cook the lemon-covered slices in a large skillet for about 5-8 minutes.
  8. Pour the skillet's contents into the large baking pan.
  9. Pour half a cup of water into the baking pan along with the cooked eggplant pieces.
  10. Sprinkle the brown sugar mixture over the top of the eggplant slices.
  11. (Optional) Add the firm pieces of eggplant that you set aside earlier into the baking pan with the cooked eggplants. These firm pieces will provide an extra "apple-like" crunch.
  12. Mix the Quick Oats, Butter, and 1/2 cup of brown sugar in a separate bowl to make the topping. Then sprinkle the topping over the the eggplant slices.
Baking Instructions
  1. Preheat oven to 375F.
  2. 50 Minutes before serving place the tray into oven.
  3. Bake for 40 minutes at 375F. 
  4. Serve your Aubergine (mock apple) crisp while it is hot and fresh.
Notes:
  1. Over-baking can cause eggplants to reveal their "true" nature and flavour.
  2. Remove as much of the soft insides of the eggplant and seeds as that will remove a lot of the bitter flavour of eggplant.
  3. The firm parts of the raw eggplant should "feel" like cutting apple slices.
  4. It won't completely taste like apple crisp but some ice cream will help keep the illusion going.
  5. Using melted butter along with the oats helps to create a more tender topping with a little crunch. An added benefit is that while the crisps bakes the beautiful oat topping for the crisp stays in place and crisps on top.
We served this dish recently to our friends without telling them that the dessert's main ingredient was actually a vegetable. Upon finding out, our friends were amazed and some even said "mind blown!". Needless say that this recipe is a hit! If you make this recipe or if you have made any other "mock" dishes let me know in the comments below.

A plate of hot Aubergine Crisp.

Thursday, September 25, 2014

Red Bean Taiwan Wheel Cake and a Nordic Ware Eggs Plus Pan Review

I am super excited to be sharing with you these Taiwan Wheel Cakes that I made using the Nordic Ware Eggs Plus Pan. I received this awesome Nordic Ware swag along with their Microwaveable Prep & Serve Bowl Set for the upcoming Food Bloggers of Canada conference in October. 

These are super delicious and you can choose to put whatever filling you want inside. The first time I made these we filled it with fresh blueberries. Wheel Cakes are a street food dish often found in Tawian and other parts of Asia. There are often a variety of different fillings but red bean is the most popular.


Ingredients for the Red Bean Taiwan Wheel Cake with the Nordic Ware
Eggs Plus Pan and the prep bowls.

Red Bean Taiwan Wheel Cake Recipe

Yield: 6 Red Bean Wheel Cakes

Wet Ingredients
  • 3 Large Eggs (160g)
  • 1.5 Cups of Milk (320ml)
  • 3 oz of Melted Butter (80g)
  • 1 tsp of Vanilla
Dry Ingredients
  • 1.75 Cups of Flour (320g)
  • 2 Tbsp of Sugar
  • 2 Tsp of Baking Powder
  • 1 tsp of Salt
Extra Ingredients
  • Oil
  • Pack of Red Bean Paste
Directions:
  1. Combine the Wet Ingredients and whisk until they are combined. Then combine/sift the dry ingredients. Next, add the dry ingredients to the wet ingredients. Stir until the batter is smooth and transfer to a measuring cup with a spout. Place the Nordic Ware Eggs Plus Pan on the largest burner on your stove and set the temperature to medium heat.
  2. Brush oil into each cup.
  3. When the pan is warm-hot pour the batter about half way up the cup.
  4. Wait 90 seconds and put 1 scoop of red bean in the middle of the batter of two of the cups.
  5. Wait another 1-2 minutes for the non filled batter to cook most of the way through - the top should not be liquid, just slightly runny.
  6. Flip the non filled half onto the top of the one that is filled.
  7. Press down lightly so that the two halves join together.
  8. Wait 1-2 minutes for the wheel cake to continue cooking.
  9. Flip the entire cake and cook on the other side for another minute.
  10. Take the wheel cake out of the pan and place it on a cooling rack or serve immediately.


Overall, the Nordic Ware Eggs Plus Pan demonstrated even heating throughout as can be seen in the picture above. The non-stick surface made it really easy to pop the wheel cakes out, and no additional oil was even needed before putting in more batter. I also did use the pan for making crustless quiches which I'll blog in another post. 

I am so happy to see how amazing these Taiwan Wheel Cakes turned out! Which filling would you put in these Taiwan Wheel Cakes? Share your thoughts below or if you make this recipe let me know in the comments below.

Tuesday, December 24, 2013

Recipe: Chewy Gingerbread Cookies

This blog post was entered into the Christmas in July Cookie Contest through Eat In Eat Out Magazine in conjunction with the Food Bloggers of Canada. 


It's finally Christmas Eve! 'Tis the season for many delicious goodies and my kitchen has been doing its share (check out my Instagram feed for some pictures). From madelines, to macaron flavours, to gingerbread cookies. Which brings me to today's recipe which are some absolutely delicious chewy gingerbread cookies.

Personally, I love gingerbread cookies that are not only chewy but also ones where you can taste the ginger, cinnamon, and other spices. So, if you are looking for some chewy gingerbread cookies, then look no further!


Ingredients

  • 3  1/2 Cups All-purpose flour
  • 1  1/2 teaspoons ground ginger
  • 1  1/2 teaspoons ground cinnamon
  • 1  teaspoon all spice
  • 1/4 teaspoon salt
  • 1/2 cup granulated sugar
  • 1 large egg
  • 1 cup molasses, warmed
  • 1 teaspoon baking soda
  • 1  1/2 teaspoons warm water
  • 1/2 cup unsalted butter
  • 1/2 cup of sugar for dipping

Instructions 


  1. Sift the flour, spices and salt together in a large bowl.
  2. In the bowl of a stand-up mixer with the paddle attachement or in a bowl with a hand mixer, cream the butter and sugar together (approx. 3 min)
  3. Warm up the molasses in the microwave for approximately 10-15 seconds.
  4. Beat in the egg and molasses to the creamed butter and sugar. Scrape down the bowl after each addition.
  5. Dissolve the baking soda in the warm water and to the molasses mixture. Beat until smooth.
  6. Gradually blend in the dry ingredients (flour, spice, salt).
  7. Cover and chill for a few hours; until the dough is stiff and can be molded.
  8. Preheat the oven to 350F.
  9. Line baking sheets with parchment paper or silicon mats.
  10. Once the dough is finished chilling, start to roll small balls of dough for cookies.
  11. Flatten the dough with your palms to form a small disc.
  12. Dip the dough disc into a small bowl filled with sugar. Ensure all sides are covered.
  13. Place the cookie onto the baking sheet. Space the cookies about 2 fingers apart. 
  14. Bake the cookies for 10 minutes at 350F for chewy gingerbread cookies.


Monday, October 14, 2013

Step by Step Homemade Pumpkin Spice

Pumpkin spice ingredients: ginger, cloves, cinnamon, nutmeg, all spice
Ingredients for pumpkin spice: ground cloves, ginger, cinnamon, all spice, nutmeg 

Now that it's Fall, I've been playing around with making my own pumpkin spice at home. Super easy to make and was perfect for making pumpkin pie or incorporating into the buttercream for pumpkin spice macarons! 

Ingredients for Homemade Pumpkin Spice

  • 2 Tbsp. (15g) Ground Cinnamon
  • 1 Tbsp. (7g) Ground Ginger
  • 2 Tsp. (5g) Ground Nutmeg
  • 1//2 Tsp. (1g) All Spice
  • 1/2 Tsp. (1g) Ground Cloves

Directions for Homemade Pumpkin Spice 

  1. Measure out all the spices. I use a scale to measure it out to the exact g. Measuring with a tablespoon or teaspoon works nicely too.
  2. Mix all the ingredients together. 
  3. Store in an air tight container until you are ready to use.
This pumpkin spice smells really good! Look for the next post where I make macarons with this pumpkin spice mix.

Tuesday, September 24, 2013

Delicious Corn Cookies - Momofuku Style

Stack of Corn cookies using momofuku's recipe.
A stack of soft corn cookies.
Corn cookies. Who would think that these two little words would make so many people crave a bite of these soft corn cookies. The recipe for these particular corn cookies comes from the creative mind of Christina Tosi from Momofuku's Milk Bar. Their headquarters is located in New York City, but they recently opened a store in Toronto which is where I visited.


Corn Cookies from the Momofuku Milk Bar
Menu board at Momofuku Milk Bar
The most exciting part of the visit - a walk in refrigerator where all the baked
goods and cookie mixes are held! Every item is baked in the NYC bakery and then shipped
to all of their locations or even personally shipped to you if you so desired. 
All the ingredients for making corn cookies.

Ingredients for Corn Cookies (12-15, depending on size)


  • 225g butter (2 sticks) at room temperature 
  • 300g (1  1/2 cups) sugar
  • 1 egg
  • 225g (1  1/3 cups) flour
  • 45g (1/4 cup) corn flour 
  • 65g (2/3 cup) freeze-dried corn powder 
  • 3g (3/4 tsp) baking powder 
  • 1.5g (1/4 tsp) baking soda 
  • 6g (1  1/2 tsp) kosher salt 
Baking Notes:
  • Freeze-dried corn can be found at health food stores, MEC, Amazon, or from the Milk Bar's online store. If it comes whole, just process the corn through a food processor until finely ground. Keep it in the fridge in a air tight container.
  • Corn flour is finely ground corn meal. I found my corn flour at Bulk Barn here in Edmonton or the Rob's Red Mill brand carries it as well. 

Directions for Corn Cookies

Sugar and butter inside the bowl of a stand up mixer.
Sugar and butter inside the bowl of a stand up mixer. 
1. In the bowl of a stand up mixer, combine the butter and sugar using a paddle attachment.

2. Cream the butter and sugar together on medium-high speed for 2 to 3 minutes. It should start to look fluffy and well combined.
Creaming the butter and sugar together on high speed for 2-3 minutes.
3. Using a spatula, scrape down the sides of the bowl, then add the egg. 
Inside the bowl of a stand-up mixer, add an egg with the creamed butter and sugar.
Add 1 egg into the creamed butter and sugar. 

4. Beat the mixture for another 7-8 minutes. According to Christina Tosi, this is the most important step towards ensuring that the corn cookies you make at home look and taste exactly like the ones from their store. 
On high speed cream the sugar, butter and eggs for a total of 10 minutes.

creamed butter, sugar and eggs inside a stand-up mixer.
The 10 minute creaming process yields this visual result.
5. Once the mixture is fluffy and white, reduce the mixer speed to low and add in the freeze dried corn powder, corn flour, four, baking soda, baking powder and salt. 
Adding freeze dried corn to the mixture.
Add in the freeze dried corn while the mixer is on low speed.
Add in the rest of the dry ingredients to the mixture.
Add in the rest of the dry ingredients. 


6. Mix until the dough comes together (about 1 minute). Scrape down the sides of the bowl and transfer the dough to a work surface.
Corn cookies dough on a work surface.
Transfer the dough to a work surface.
7. Using a 1/3 cup measure, portion out the dough.

Measure out the dough with a 1/3 measuring cup.
Measure out the dough using a 1/3 measuring cup.

8. Roll the dough into balls, then place them onto parchment paper. Leave space (at least 4 inches apart) between the cookies in order for them to expand in the oven. Pat the tops of the cookies flat. 
Roll out the measured dough into balls, then place onto baking pan (approx 4" apart).
 9. Cover the sheet pans tightly in plastic wrap and refrigerate for at least 1 hour (up to 1 week is possible). Again, Christina Tosi advises that these cookies been put in the fridge prior to baking in order to ensure that they bake properly. Do not bake from room temperature.
Cover cookies with saran wrap and then place in the fridge for 1 hour.
Cover the pan with saran wrap, then place the trays in the fridge for 1 hour.
10. After the cookies have been in the fridge for 1 hour or more, turn the oven on to 350F. Bake the cookies for 15-18 minutes. They will puff up and spread. They will be done when they are are still yellow in the middle, but has a bit of brown on the edge. Allow for another minute or two if they don't look completely baked.
Corn cookies expanding in the oven.
Corn cookies finished in the oven.
Corn cookies finished in the oven. 


11. Allow the corn cookies to cool completely on the pan before transferring them to an air tight container.
corn cookies cooling on the pan.
Corn Cookies cooling on the pan.
12. These cookies can be kept at room temperature for at least 5 days. They can also be frozen in the freezer for at least 1 month.
Finished corn cookies. Don't they look beautiful? Super tasty! Try them out!