Wednesday, June 17, 2015

Celebrate International Sushi Day & a Edo Japan Giveaway!


Who loves sushi? If you love sushi as much as I do then you will certainly appreciate today's giveaway! Today (Thursday June 19) is International Sushi Day and Edo Japan wants to celebrate it with you!


Edo Japan has its roots in Calgary, Alberta but now has expanded to many locations across Canada. If you haven't had your chance to try their food, here is your chance! Enter in the rafflecopter below!

Please note, there is a mandatory entry to complete. You must comment (located below the rafflecopter) to be entered into the giveaway. Share what is your favourite sushi memory.  The more details you give the better! You must log your info into the rafflecopter otherwise your entry will not be counted.  Also, this giveaway ($50 giftcard to Edo) is limited to areas where Edo Japan is located. Good luck! Contest closes midnight Wednesday June 24, 2015.

a Rafflecopter giveaway

Monday, June 15, 2015

Re-Cap of the Croissant Bake-off

 
As promised from my last post, here is the re-cap from our Croissant Bake-off where I baked the Duchess Bake Shop croissant using their cookbook, Dan baked the sourdough croissant from Tartine Bakery's cookbook, Addie baked David Lebovitz' Whole Wheat Croissant and Lesley followed a croissant recipe from La Cuisine Paris
The plan was that everyone's croissant dough was to be mostly prepped upon arriving at L & S' house and then the croissants would be baked off in succession. Above, is a picture of everyone prepping their croissants doughs to roll out, proof or preparing the egg wash for the oven. 

One reason for us baking all the croissants around the same time frame was because we wanted to see the cross section of each croissant fairly soon after they have been baked. Above is the cross section for the croissant I baked (using Duchess Bake Shop's recipe). You can see that there are a number of layers and some space in between the layers. 


Dan's croissant using Tartine's sourdough recipe is out of the oven! Here Dan is cutting a cross section of his, under the watchful eye of Addie :D. 

Here is the Parisian recipe that Lesley baked. As you can see, it also has a number of layers as well as a flakiness to it. 

Here are all the croissants lined up according to size. Now, Addie did say that he cut down his whole wheat croissant dough in half so usually they should be similar in size to the Parisian and Duchess' croissant size. 
 
Cross-section of all four of the croissants. From left to right: Duchess' recipe, David Lebovitz', Le Cuisine Paris and Tartine's croissant. One big difference is the use of flour across all the recipes. Granted, Addie used 60% whole wheat flour his. Tartine's recipe called for 100% bread flour, Duchess' recipe used mostly all purpose flour except for bread flour in the starter, and the Parisian recipe was 100% all purpose flour. 

In terms of flavour, Lesley used the most expensive butter out of the four of us. Using more expensive butter with a higher fat content does not affect the flakiness but it definitely showed in the smell and taste of the croissant. The Tartine recipe used a sourdough starter so that croissant had the distinct creamy sour dough taste to it. However, it also had the nicest volume and colour compared to the rest. 

In terms of texture, Tartine's recipe asked for 100% bread flour which results in a breadier croissant whereas using 100% all purpose flour will result in a flakier croissant like Le Cuisine Paris' recipe. 

Now, to get super technical. According to Dan's research, whole wheat flour while healthier results in denser croissants because the whole wheat flour is heavier and sharper (jagged) which prevents gluten development. As a result, it looks more dense compared to the other croissants. 

Overall, we found that the Duchess recipe was the most accessible for the first-time croissant baker compared to all of the other recipes. Mostly because there are step by step pictures to accompany the easy to follow instructions, exact descriptions for size, dimensions and how many croissants would be made. In comparison, the other recipes needed a sourdough starter to be made first before even starting, and lots of technical details for rolling and folding with fewer pictures. 

Lastly, we compared the croissants we baked with the ones from local bakeries. Cindy (from Lets Om Nom) bought croissants from Cafe Bicyclette, Bonton Bakery and Leva. Sadly, she didn't have enough time that day as she was already criss-crossing the city for croissants from Duchess. 

So in the picture above, the top left picture has Leva's on the far left, a cross-section of Bonton's croissant, and lastly on the bottom left in a cross-section of Cafe Bicyclette's. We did learn that croissants from Cafe Bicyclette are imported frozen from France and baked in house.  

So in the end, if you are considering baking versus buying croissants it is worth trying to bake croissants at home - at least once. There is nothing that can compare to the aroma of fresh baked croissants at home. It does take roughly 6 hours of work, even with me following Duchess' easy to follow recipe so I can see how that can be a daunting task. 

However, to make it fun ask a couple of friends to join you in the process!  

Saturday, June 6, 2015

Croissant Challenge - Baking the Duchess croissant


The above picture depicts some beautiful croissants that I not only baked, but made from scratch! So, you are probably thinking this is something I do every once in a while considering my love for macarons and complicated baked goods. However, I must say this picture also represents the very first time I have ever baked croissants - unless you count those Pillsbury ones that we used for the homemade cronut post. Like every great picture there is a backstory and this picture is no exception to that rule. 
Back in November 2014, I had the very exciting opportunity to attend the launch of Duchess Bake Shop's cookbook. While Giselle was introducing the cookbook she mentioned how some recipes were easier than others such as the Ginger Cookies and some were more challenging such as the macaron recipes and the croissants. At that moment, the thought occurred to me that I had to bake the Duchess croissants. 

Several months later, around our dinner table a few friends and I decided that it would be fun to do a croissant bake-off. Yes! A croissant bake-off where each person would choose a different croissant recipe to bake from and then we would time them all to bake-off around the same time for maximum freshness (more on that in the next post).  For now, here are some notes and pictures from my experience baking the Duchess croissant.

The first thing to do was to make the starter. So I measured out the yeast and warm water. While that was dissolving, I added in some bread flour and then let it rise. Then, I measured out some butter, sugar and salt and added that directly to the starter. 

Next, I placed the starter in an air tight location (I usually set it inside the microwave) so it could grow some more. After about 30-45 minutes, the starter was ready to use! I moved the starter to the mixing bowl, added in the milk and all purpose flour and mixed it at low speed. It should all come together and look like this (below).  

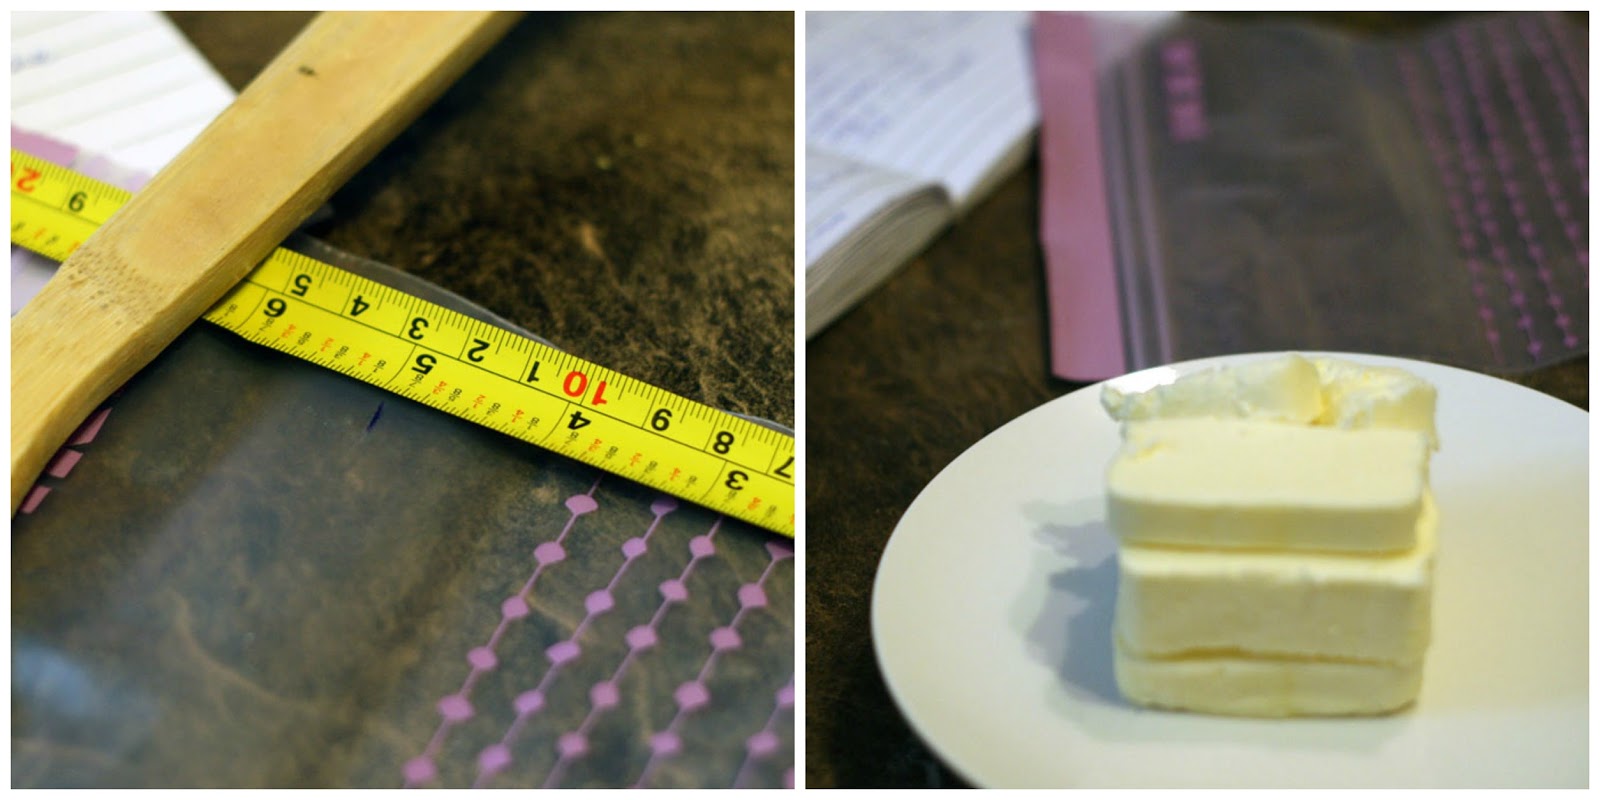
Once the dough was made, I placed it into a oiled bowl and let it rise for about 90 minutes. Meanwhile, the butter plaque had to be made! The butter plaque has to fit nicely into the dough (like a package). This step took a little bit of measuring, hence the measuring tape. 

The Duchess recipe book had a great suggestion to create a nicely shaped butter plaque using a resealable plastic bag. I didn't quite have the same dimensions for the bag specified in the recipe but I measured it out to be approximately the right size for the butter plaque. The recipe in the book also has some easy to follow instructions for how to make this.

By the time I finished making the butter plaque and placed it into the fridge to keep cold, the dough had doubled in size and was ready to use. For Christmas, I got Dan a marble rolling pin and it is probably the best kitchen item we have bought! The heavy weight makes rolling the dough out a breeze! Honestly, getting the dough to the size I needed to fit the butter plaque in took no time at all. Dan can attest to this as he had previously used a light wooden rolling pin for the cronuts.

One of the things that was different about this croissant recipe compared to others is cutting the dough in half- instead of folding. With the butter plaque firming in place, I squished the sides of the dough closed in order to keep the butter inside.

Next, came some more rolling, placing the dough back into the fridge (so the butter doesn't melt) and specific folds such as the book fold and the single fold (sort of like folding a letter). The recipe in the Duchess cookbook is very detailed so it was quite easy to follow. 

After all that, the dough rested in the fridge for another 40 minutes. By this time, I was getting tired as it was hitting close to 12am (I started this croissant baking later than expected at 8pm on a Friday). However, we had decided to bake off all of our croissants around the same time the next day, so I was determined to finish! This recipe is also a bit different compared to other recipes as there is less proofing time and folds other than the book and single fold.

I rolled out the dough to about my arm's length and then scored triangles out. In order to have the characteristic crescent shape for this style of croissants (not chocolate or almond), you want to cut a small line at the base of each croissant before you roll.

The almost finished product! Here they are! Beautiful raw croissants.  Once rolled, they sat overnight in the fridge under saran wrap.  


In the morning, I took the tray of croissants out and placed them into the cold oven to continue proofing (approximately 1-2 hours). They should grow a little bigger. 

Once we arrived at L & S' house, we quickly whisked together a egg wash made from egg, salt and milk to brush over each croissant and popped my croissants into the oven! 


After 18 minutes of baking at 425F in L & S' oven, my croissants were done! 


Stay tuned for the next post about the comparisons and results from the croissant bakeoff!

Friday, May 8, 2015

The Food Blogger Dinner at the Fairmont Hotel Macdonald


champagne_beyondumami

Last Tuesday I had the amazing opportunity to meet Executive Chef Serge Jost at the Fairmont Hotel Macdonald's Harvest Room. Not only did I share a meal with Chef Serge but I had the chance to cook with him as well! I along with a few food bloggers and food lovers experienced an interactive dinner as a part of the Fairmont Macdonald's second annual interactive dinner. When we arrived at the Harvest Room, there were beautiful 3 course menus laid out for us to read and then cook! Yup, you read that right. The only way we would be able to enjoy an amazing dinner that night in the Harvest Room was to first cook it up ourselves! Thankfully we did have help!
Picture of all participants at the interactive dinner.
So, let me introduce you to the cooking/food loving team! At the back row from left to right is Brittany Watt (from Harvest Microgreens),  Chef Jost, Lindsay (from Edible Woman), me, and Santana (our delightful server). Then in the front row is Linda Hoang (Linda-Hoang.com) and Cindy N (from Let's Om Nom). 


We were quickly split into three teams of two by Chef Jost and made our way into the Harvest Room kitchens! Everyone was super excited and thankfully each team of two only had to prep and cook one dish. Linda and I had the awesome opportunity to be paired with Chef Jost to make the appetizer course. 
Goat cheese, beet gastrique, candy cane beets and nuts being roasted on a cast iron collage.
There were many components to our "Beets & Goat Cheese" appetizer which was composed of a beet gastrique, quail egg, spiced hazelnuts, apple cider vinaigrette, celeriac, candy cane beets, watercress & argula. Now, since our dish was first up we had to work quickly! Under Chef Jost's directions we lightly roasted nuts over a cast iron pan (seasoned with pepper & salt) to make goat cheese cubes, prepared celeriac mousse cubes (prepared in the Thermomix and flash frozen), yellow beets cubes, prepare a cider vinaigrette, and quail eggs.
Goat Cheese mixed with roasted nuts and a sprinkle of salt in a bowl.
Look at the beautiful colours in the goat cheese! 
While we were sweating away (literally as cooking next to the oven is hot!), the main course and dessert team were also working hard to prepare their dishes.
filleting fish, mixing dessert, gnocchi making and hot liquids!
Top to Bottom: Sea Bass being filleted, Cindy preparing a dessert component, Brittany & Nicole preparing the gnocchi, and Lindsay preparing a part of their dessert. 
As we prepped and cooked the appetizer with Chef Jost we learned so many tips and tricks. First of all, Linda and I were given many reminders to always taste our food! Also that all dishes should have a nice balance of acidity to it.
tasting our food in the kitchens of the Fairmont Hotel
Thanks to Lindsay for capturing this photo of us! 
After a flurry of activity to prep all the components for our appetizer we were ready to plate! First, I painted the beet gastrique onto the plate with a brush and then the rest of the components went onto the plate. 
appetizer plates all laid out.

Once we returned to the table Linda and I were greeted by an amuse-bouche composed of a passion fruit and watercress pesto. A perfect way to start dinner!
passionfruit amuse bouche

Then, our own appetizers were served to the whole table - a beautiful Beets & Goat Cheese appetizer! Out of all the components I really loved the celeriac mousse (the white cube in the foreground which is solidified with agar agar), followed by the goat cheese cubes infused with roasted nuts.
beet and goat cheese appetizer with beet gastrique, quail egg, spiced hazelnut, apple cider vinaigrette, celeriac, watercress and arugula.

Finally, Linda and I could relax and enjoy some of this gorgeous bread while those making the main finished up their preparations and got them ready to serve.
beautiful chunks of bread

Wow! The entree team did an awesome job with their Panseared Sea Bass on top of a saffron 7 herb gnocchi, summer vegetables (including turnips- the white veggie) topped with a warm rhubarb vinaigrette and a crispy kale leaf. The main was also paired with my favourite Sauvignon Blanc from Oyster Bay New Zealand.  
main course of panseared sea bass

The last course was dessert. Lindsay and Cindy worked hard to get every single one of their sweet green salad & pink grapefruit desserts to not only taste amazing but to look the same! Yes, there were veggies in the dessert! Chef Jost said that he liked adding something unique and unexpected to a dish. In this case the lettuce leaves were tossed with vanilla and olive oil. Under that was a sweet mesclun, grapefruit sorbet and a creme catalane. A very bright, creamy and cool dessert to end an amazingly unique night.
sweet green salad and pink grapefruit in a cup (looking at it from above).

It is not often that I can say that I not only dined with a chef but also cooked a meal together with him! It was such a great evening to share in amazing food and sit down with Chef Jost during dinner. He talked about how anytime he makes a dish he is never finished and pushes further to make it better. He also believes very much in using real food to make healthy dishes where you can taste the actually "taste the food". 

Picture of Chef Serge Jost inside the Harvest Room.

This was honestly the highlight of my week (or month!). If you haven't had the chance to visit the Harvest Room go and make a visit. Also this year marks Fairmont's centennial so there are a number of events including high tea (with loose leaf tea) and their equally amazing brunch that you can partake in! As well, for those having limited time during the week there are now "45 minute experience" 3 course lunches that are available for $24. 

with a 100 year chocolate plaque

Fairmont Hotel Macdonald
Harvest Room
10065 100th Street 
Edmonton, AB
(780) 429-6424

You can also follow Chef Serge Jost on twitter!

Thursday, April 23, 2015

Macawrongs - When Macaron Baking Doesn't Go Right


Does the above picture ever look like some of the macarons that come out of your oven? Over the past couple of years many a "macawrong" has come out of my oven! It definitely has been upsetting when I crack open the oven and instead of beautiful smooth macarons with lovely feet (the ruffled edges on a macaron shell) I see a pan of these shells there. In fact, just this week I experienced a batch of macawrongs myself.


The purpose of this post is to continue to encourage you all to keep baking those macarons. Yes, they can be finicky despite all the work we put into them. Let's do some digging into why these macarons look like this. My hubby Dan, an engineer by trade, who has seen me through this journey of macaron making will also help dissect what likely happened in these macawrongs. 

In the macaron shell above, there appears to be a nice feet or pied (french for the ruffled edge). However, the top of the macron appears to almost mushrooming over the top. When we look at this macaron shell from above, it also seems that the piping was inconsistent given the slight irregular shape of the circle. One of the possible causes for this above macawrong is due to over resting. Yes, that can happen! Resting your macarons for up to 2 hours depending on humidity can lead to positive results, but in this case this shell was rested for over 4 hours (it was a humid day, so I had thought that resting it more might help).  

In the macawrong above we see that there's a "fissure" where the feet should be. These are not feet, as we can see the bottom of the shell is rounded into the mat. We think this was due to two things, a large air bubble inside the macaron which caused the top of the shell to rise very quickly and result in the split. So tamping (or banging the sheet of macarons on the counter) can help bring the air bubbles to the top and the flatten the pointed tip on top of the macaron. Also using a toothpick to poke out the air bubbles after tamping will help.

This macawrong was caused because the shell was likely not dried long enough. When the macarons are dried enough, it should be dry to the touch. So when this macawrong was baked in the oven, it immediately cracked due to the heat of the oven. This crack can also occur if your oven is too hot or there is an air bubble in the macaron.

To ensure the best possible macarons follow along in my Macaron 101Macaron 102 and Macaron 103 posts. I walk you visually through all the equipment you will need and also tips and tricks at each step to help you be as successful as possible in your macaron journey. 


Let me know how it goes and feel free to leave me comments and we can trouble shoot together. Have fun despite the macawrongs! Always know that one day perfect macarons will come out of your oven!


Sunday, March 29, 2015

Austin Adventures - Sake Social at Uchiko Austin

When we did our research for places to eat in Texas, one of the food tips that stood out was the Sake Social at Uchiko or Uchi. In our food calendar for the week (yes, we have a food calendar when we travel!), Uchiko was planned for either in Houston or Austin.
After exploring Austin most of the day by taking some easy hikes, enjoying some beautiful views and dipping our foot in the Barton springs we decided to freshen up and make it to the Sake Social at Uchiko Austin for 5pm.

The Sake Social happens every day from 5-6:30pm. It is pretty much happy hour with drinks and food at "happy hour" prices. Here's a link their sake social menu. Thankfully, the place we were staying at was fairly close to Uchiko, so we made it there very close to 5pm. Upon arrival, Dan and I were treated to their complimentary valet service. Seriously, such a great service to have as it's harder to find free parking in Austin. Also another first for us in Austin as I am pretty sure we haven't experienced that before.
Once we arrived, I was more than excited to find out that there was still space at the sushi bar! This was also a food tip from what we read and I highly recommend doing the same if you are a small party of 1 or 2. While sitting at the sushi bar you not only get to see all the food action, but you also get to interact with the sushi chefs. After we sat down and ordered our drinks, the chef who was working in front of us, Kelsey, introduced herself and gave us some great recommendations on where to start in the Sake Social menu.    


We started with the crispy Brussels Sprouts that had a sweetness from the fish caramel (we think it's caramelized fish sauce) and finished off with lemon and chili. I don't usually love brussels sprouts, but if they are always presented this way I definitely could eat more of them
 I love hamachi (yellowtail so when I saw that their Negihama roll had yellowtail, I knew I had to order one of those. In fact by the end of the night we ordered two of these rolls! Uchiko's yellowtail actually comes from Japan, so we even had a taste of Japan tonight.
The next dish we had was the Koviche. A play on ceviche with fresh diver scallops, black lime, kalamata and tomatillo. Tomatillo is actually part of the tomato family and added a slightly crunchiness to this dish along with the scallops and balanced very well with the lime. 
The next dish that Kelsey recommended was the Bacon. You can just see the crispy rice peeking out from this dish, and there is an ajitama egg buried under the onions, cilantro and cucumbers. Using a spoon we mixed the egg and all the ingredients in the bowl together. I would characterize this dish as comfort food. Probably because crispy rice and and an egg harkens memories of childhood for me.
The Komaki Roll was probably Dan's favourite plate of the night. Think: Fresh. Mainly due to the pickled red peppers, gobo (burdock root), carrot, topped with onions and mint leaves. It was also wrapped in a soy paper (as opposed to the usual sea weed wrap) which made the roll very unique.
The pork ribs which came after were super soft, like, fall-off-the-bone soft. Kelsey explained that this was because they were prepared in a sous vide bath and finished on a grill with galangal (which is part of the ginger family).
Hearing how much I love hamachi, Kelsey/Uchiko treated us to a dish called "Hama Chili". The Japanese yellowtail rested on sliced orange supreme in ponzu sauce and was topped with thai chili. It was melt in your mouth yellowtail.
Dan and I, then, decided to venture out of our comfort zones a little; or more like I ventured out of my comfort zone and ordered the gyutan nigiri. If I didn't know, I would have no idea that this was grilled beef tongue as it was so tender. The yuzu kosho (made of lime zest, yuzu, thai chili) balanced the flavour of the beef tongue very well.
 
I also noticed that there were fresh  oysters on their daily special menu. So, Dan and I ordered half a dozen Beausoleil oysters. These oysters have a nice briny start and a sweet finish. In this case, Uchiko also flavoured theirs with cucumber granita, lime and a touch of chili.
We were starting to get full by the time we got near to desserts. Now, for those of you that know me, there is one Cantonese style dessert that I love called Deep Fried Milk. In his research, Dan noticed that Uchiko also had their version of Fried Milk. Their deep fried milk has a roasted corn flake crust, and accompanied by whipped chocolate milk, toasted milk, and an iced milk sherbet. So good! 
 Last but not least, was Kelsey's favourite dessert that she ordered for us of the Sweet Corn Sorbet. Polenta Custard, caramel salt, and lemon gelee. I really liked how the lemon flavour interacted with the polenta custard. I am thinking I will have to try making a polenta custard once we get home as my friend who is gluten free would love this!

We really enjoyed our time at Uchiko and I would definitely recommend visiting during the Sake Social. The staff are really friendly and helpful, and if you are able to, sit at the sushi bar since you will get a great interactive experience.
Uchiko
4200 N Lamar Blvd
Ste 140
Austin, TX 78756
http://www.uchiaustin.com