Showing posts with label breakfast. Show all posts

Saturday, June 6, 2015

Croissant Challenge - Baking the Duchess croissant


The above picture depicts some beautiful croissants that I not only baked, but made from scratch! So, you are probably thinking this is something I do every once in a while considering my love for macarons and complicated baked goods. However, I must say this picture also represents the very first time I have ever baked croissants - unless you count those Pillsbury ones that we used for the homemade cronut post. Like every great picture there is a backstory and this picture is no exception to that rule. 
Back in November 2014, I had the very exciting opportunity to attend the launch of Duchess Bake Shop's cookbook. While Giselle was introducing the cookbook she mentioned how some recipes were easier than others such as the Ginger Cookies and some were more challenging such as the macaron recipes and the croissants. At that moment, the thought occurred to me that I had to bake the Duchess croissants. 

Several months later, around our dinner table a few friends and I decided that it would be fun to do a croissant bake-off. Yes! A croissant bake-off where each person would choose a different croissant recipe to bake from and then we would time them all to bake-off around the same time for maximum freshness (more on that in the next post).  For now, here are some notes and pictures from my experience baking the Duchess croissant.

The first thing to do was to make the starter. So I measured out the yeast and warm water. While that was dissolving, I added in some bread flour and then let it rise. Then, I measured out some butter, sugar and salt and added that directly to the starter. 

Next, I placed the starter in an air tight location (I usually set it inside the microwave) so it could grow some more. After about 30-45 minutes, the starter was ready to use! I moved the starter to the mixing bowl, added in the milk and all purpose flour and mixed it at low speed. It should all come together and look like this (below).  

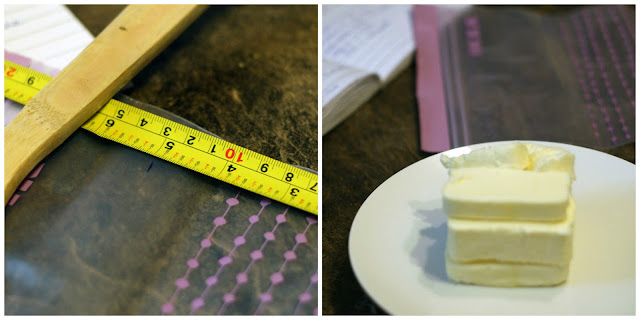
Once the dough was made, I placed it into a oiled bowl and let it rise for about 90 minutes. Meanwhile, the butter plaque had to be made! The butter plaque has to fit nicely into the dough (like a package). This step took a little bit of measuring, hence the measuring tape. 

The Duchess recipe book had a great suggestion to create a nicely shaped butter plaque using a resealable plastic bag. I didn't quite have the same dimensions for the bag specified in the recipe but I measured it out to be approximately the right size for the butter plaque. The recipe in the book also has some easy to follow instructions for how to make this.

By the time I finished making the butter plaque and placed it into the fridge to keep cold, the dough had doubled in size and was ready to use. For Christmas, I got Dan a marble rolling pin and it is probably the best kitchen item we have bought! The heavy weight makes rolling the dough out a breeze! Honestly, getting the dough to the size I needed to fit the butter plaque in took no time at all. Dan can attest to this as he had previously used a light wooden rolling pin for the cronuts.

One of the things that was different about this croissant recipe compared to others is cutting the dough in half- instead of folding. With the butter plaque firming in place, I squished the sides of the dough closed in order to keep the butter inside.

Next, came some more rolling, placing the dough back into the fridge (so the butter doesn't melt) and specific folds such as the book fold and the single fold (sort of like folding a letter). The recipe in the Duchess cookbook is very detailed so it was quite easy to follow. 

After all that, the dough rested in the fridge for another 40 minutes. By this time, I was getting tired as it was hitting close to 12am (I started this croissant baking later than expected at 8pm on a Friday). However, we had decided to bake off all of our croissants around the same time the next day, so I was determined to finish! This recipe is also a bit different compared to other recipes as there is less proofing time and folds other than the book and single fold.

I rolled out the dough to about my arm's length and then scored triangles out. In order to have the characteristic crescent shape for this style of croissants (not chocolate or almond), you want to cut a small line at the base of each croissant before you roll.

The almost finished product! Here they are! Beautiful raw croissants.  Once rolled, they sat overnight in the fridge under saran wrap.  


In the morning, I took the tray of croissants out and placed them into the cold oven to continue proofing (approximately 1-2 hours). They should grow a little bigger. 

Once we arrived at L & S' house, we quickly whisked together a egg wash made from egg, salt and milk to brush over each croissant and popped my croissants into the oven! 


After 18 minutes of baking at 425F in L & S' oven, my croissants were done! 


Stay tuned for the next post about the comparisons and results from the croissant bakeoff!

Thursday, November 13, 2014

Easy Crustless Quiche Recipe & A Giveaway!


When my husband and I made the Taiwan Red Bean Wheelcakes back in September, we were trying out various recipes that could be used on the Nordic Ware Eggs Plus Pan. One thing that you should know about my husband is that he is a huge proponent on ensuring that every single one of our kitchen gadgets must not be single function kitchen tools (with the exception of a can opener). This means that any kitchen gadget that lives in our kitchen must be able to be used for different recipes. 

The first recipe we made with the new pan was actually not the Taiwan Red Bean Wheelcakes but instead Crustless Quiches!


So below is the recipe for the Crustless Quiches. Make sure you read all the way to the end for exciting details on how you can win the Eggs Plus Pan for yourself!

Crustless Quiches

Ingredients
  • approx. 1 cup of milk
  • 4 eggs
  • 3-4 filling ingredients such as tomatoes, onions, cheese, spinach etc.. The sky's the limit!

Directions:

  1. Dice up all the ingredients into smaller pieces as the quiche cooks fairly quickly.
  2. Beat eggs and milk together in a bowl. Transfer the filling to a bowl with a spout and pour the egg mixture about half-way up each reservoir. Oiling each reservoir beforehand is optional (the pan is non-stick).

  3. Once the egg mixture begins to cook, slowly add fillings to each crustless quiche. You can even put different fillings in each one and customize to everyone's preferences!
  4. Cook the crustless quiches on medium for about 10 minutes, or until the tops are cooked and the egg is no longer runny looking.
  5. Using a silicon spatula gently loosen the quiche from the pan and serve onto a plate.

We tried putting the top on the pan initially, but realized that this would soften the quiches as the pan begins to cook with steam. If you want crispy quiches, leave the top off.
It goes without saying that having individual quiche creations is great. However, you could easily use the pan for multiple uses such as making two crustless quiches, a sunny side egg and sausage all in the same pan. The pan also has a little pamphlet that comes with further ideas on how to use it.

Or, you could always make the Taiwan Red Bean Wheelcakes from my previous post!


Giveaway!

Now for the eggciting part of this post! Nordic Ware has given me an Eggs Plus Pan to give away to one lucky reader! This pan will be shipped directly to you from Nordic Ware and is open to Canada and the U.S! Enter the giveaway in the Rafflecopter below with your details. Make sure you leave a comment as that is the minimum requirement for entering the giveaway. Good luck!

Prize: One (1) lucky reader will receive a Nordic Ware Eggs Plus Pan.

Duration: Giveaway will be open until November 30, 2014.

Who Can Enter: Open to residents of Canada and the USA.

How to Enter: Please follow the instructions in the rafflecopter below. Remember that leaving a comment is mandatory.

How will the winner be chosen: The winner will be chosen at random and will be notified via email. The winner will have 24 hours to respond or a new winner will be chosen.


Tuesday, May 28, 2013

Delicious Cinnamon Hazenut Rugelachs Recipe

 
I am a huge advocate of the public library; specifically here in Edmonton I am fortunate to have access to the Edmonton Public Library; which carries many books including ones of food! So, I was super excited to come across a book titled "I Love Cinnamon Rolls!" by Judith Fertig. I've been looking for a book about Cinnamon Buns and rolls for a while now, so this was perfect.

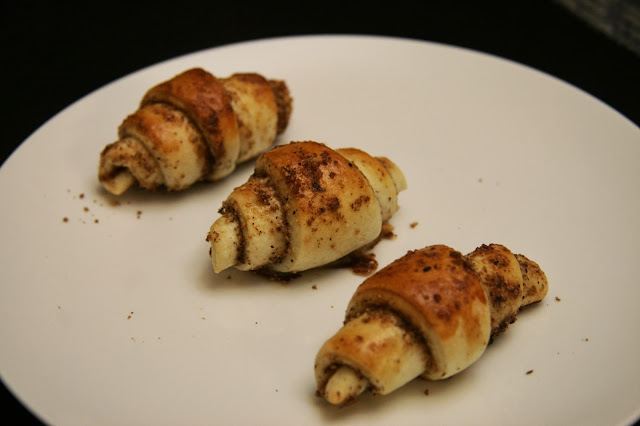
Looking through the book my husband and I came across a recipe for Cinnamon Rugelachs. They looked like cute mini croissants and I was drawn to their rolled up shape. Actually, rugelachs in Yiddish means "little twists" and are typically made of a sour cream yeast dough. Thankfully, the prep time for making these rugelachs are not as labour intensive in comparison to making croissants.


Rugelachs use a thin strudel dough recipe. The original recipe uses a walnut filling; whereas I used roasted finely ground hazelnuts. I love the smell of roasted hazelnuts! Below is the recipe for these delicious cinnamon hazelnut rugelachs.


Ingredients for Thin Strudel Dough

  • 1/4 cup whole milk
  • 1/2 cup sour cream
  • 1/2 cup unsalted butter (softened)
  • 2 tbsp granulated sugar
  • 1 tsp. salt
  • 2 large eggs
  • 3 1/4 cups of all purpose flour (with more for kneading dough)
  • 2 1/2 teaspoons instant yeast
Ingredients for Cinnamon Rugelach Filling
  • 1/4 cup finely ground and roasted hazelnuts
  • 1/2 cup packed light brown sugar
  • 1 tbsp. cinnamon
  • Egg wash (1 large egg beaten with 1 tsp. water) 
 Directions:
  1. In a mixing bowl combine the milk, sour cream, butter, sugar, and salt. Microwave on high heat for 90 seconds or until warm. Whisk in the eggs.
  2. Place flour and yeast into the bowl of a stand mixer with the paddle attachment. Add in the ingredients from step 1 (milk, sour cream, butter, sugar, salt, eggs). Mix on low speed until the dough forms a soft ball. Scrape down the sides of the bowl as needed. This should take 5-6 minutes.
  3. Switch to the dough hook and keep the mixer on low. To keep the dough from sticking to the sides of the bowl sprinkle the dough with flour from time to time. Allow to knead for 3-5 minutes. 
  4. To check if the dough is ready, stick a finger into the dough and see the dough spring back. 
  5. Take a large mixing bowl and oil it. Place dough into the bowl and cover with plastic wrap. Allow to rise in a warm draft-free place for 45 to 60 minutes. Typically we place our dough into the microwave as it is the most draft-free place in our place. Once the dough has doubled in size you are ready to start making the rugelachs.
  6. Transfer the dough to a floured surface and cut into 4 parts. (We just purchased a Roll'Pat from Williams and Sonoma (similar) which works well for rolling out dough.)
  7. Roll each part into a circle 12 inches in diameter.


8. To make the rugelach filling, if you don't have ground hazelnuts toast about 1/2 a cup of hazelnuts. Then, allow the hazelnuts to cool before finely grinding in a food processor or a Magic Bullet. Combine the ground hazelnuts, cinnamon and brown sugar together into a bowl. Using a scale measure out 4 equal portions of the rugelach filling (you can also estimate by tablespoons as needed).


9. To roll the rugelachs do the following:


Sprinkle the filling into each dough circle with 1/4 of the filling.
Spread the filling around with a pastry brush (you can also use your hands).

With a serrated knife or pizza wheel cut each circle into 16 triangles.
Thin cinnamon rugelach dough cut into 16 triangles. 
To roll: Start at the wide end of the triangle and roll the triangle into a tight crescent.
As you roll, try to keep the filling inside the triangle.
Place each roll with the strip down to prevent it from unrolling.
Place on parchment paper approximately 1 inch apart.
Allow the rugelachs to rest in a warm place for 45 minutes. They won't rise a lot. 
Preheat the oven to 350F.
Brush each roll with the egg wash mixture. 
Sprinkle any remaining filling onto the rolls. 
Bake at 350F for 13 - 15 minutes. The cinnamon hazenult rugelachs should look golden brown.

Food Notes:
  • When I make these cinnamon rugelachs again I would double the rugelach filling as there was not enough filling to sprinkle on top before baking.
Below is the link to the book on amazon. I haven't baked any other recipes yet from the book, however, so far I am happy with these cinnamon rugelachs. The rugelachs make a great snack during the day or when heated in the toaster oven are perfect to eat on the way to work in the morning. Have you baked any items from this book? Or is there a cinnamon bun recipe you typically use? Share in the comments below what you like most about home made cinnamon buns or a recipe that you enjoy using!

Saturday, February 23, 2013

Easy Cranberry & Raisin Granola bars

Easy Flapjacks/Granola Bars


Today's post comes from my desire to make a relatively healthy granola bar at home.  Many times I was tempted to just buy a box from the store, but the one I had in my mind was filled with oats, cranberries, raisins and topped with chocolate! Plus, I wanted to make mine less sweet in comparison to store bought bars. Another instigator of wanting to bake 'something' is because I purchased an absolutely gorgeous Emile Henry baking dish recently - as can be seen in these pictures.

These bars were first introduced to me by my mentors P&R on sunday nights in London, Ontario when Pam would bring out what looked to us like Granola bars, but what she called 'flapjacks' in Britain. Needless to say they were delicious! 

Ingredients
  • 1/3 Cup of Sugar
  • 1/2 Cup butter 
  • 1/3 Cup corn syrup
  • 4 1/2 - 5 Cups oats
  • 1 Cup raisins
  • 1 Cup craisins
  • dark chocolate or milk chocolate bars or chips (your preference)

Directions
  1. In a heat proof bowl,  mix sugar, butter, and corn syrup together. Melt in the microwave until it forms a consistent mixture.
  2. Mix oats, raisins and craisins into the bowl.
  3. Once all ingredients are mixed together, spread the mixture into a rectangular pan. Use a spoon to flatten.
  4. Bake at 325F for 20-30 minutes.
  5. Take out of oven. 
  6. Spread chocolate on top as it will be warm enough to melt the chocolate.
  7. Allow to cool.
  8. Cut into slices before it completely cools and hardens.
  9. These flapjacks/granola bars can be stored in an airtight container in the fridge for up to a week. 

Friday, July 13, 2012

An amazing crepe recipe

Now that summer is finally here alternative dinner options are welcomed! Crepes are nice light fare and are perfect for summer! What I love about crepes is that they can actually be eaten savoury or, what we often see, sweet.  The crepe recipe that we have gotten lots of mileage from in our household is the one from Jacques Pepin.

Ingredients
  • 2 large egg
  • 3/4 cup All purpose flour
  • 1/2 cup milk
  • 1/8 tsp salt
  • 1/2 tsp. sugar
  • 1/3 cup cold water
  • 1 tablespoon canola oil
  • 1 tablespoon melted unsalted butter + more for pan (we actually do not put butter in our batter but use it for cooking on the pan instead)
Directions
  1. In a medium bowl whisk together the eggs, flour, milk, salt and sugar until smooth. The batter will be thick.
  2. Whisk in the water, oil and melted butter (the butter can be skipped if you want)
  3. Heat a 6-inch pan (or any flat pan- we use a stainless steel one) or a non stick skillet and rub with a bit of butter. Tilt the skillet to distribute the butter evenly.
  4. Add about 2 tbsp of batter (we use a ladle to put in how much we need; as long as it thinly covers the entire pan). Tilt the skillet to distribute the batter evenly. Pour away any excess batter back into the bowl.
  5. Cook over moderately high heat until the edges of the crepe curl up and start to brown. approx. 45 sec.
  6. Flip the crepe and cook for another 10 seconds, until a few brown spots appear on the bottom.
  7. Tap the crepe out onto a baking sheet (or parchment paper)
  8. Repeat with remaining batter to make up to 12 crepes. You may need to butter the skillet a few times as time progresses.
*note* heat low to medium heat first since you don't want to burn the crepe too fast.  Once you see the edges turn then it is ready to be flipped. You can make a whole stack of crepes by stacking one on the other. Cover with a towel/plate to keep them warm. 

This recipe can be used to make savoury crepes by skipping the sugar and filling the crepes with slices of cheese, sandwich meat, spinach leaves, tomatoes, mushrooms and more!

For dessert crepes you can put chocolate, strawberry/better compote (made with frozen fruit, butter & sugar in pot on stove top), or any types of fruit. Enjoy!!


Wednesday, October 19, 2011

Waffles, Waffles, Waffles!

Over the past year, I have been extremely addicted to waffles! At every farmer's market I would hunt down the Eva Sweet Waffle truck, order waffles at Culina Highlands, and check out the other waffle trucks such as Wanda's Waffle. The sort of waffle I was craving for was the round Belgian style waffle that was crispy on the outside, air pockets on the inside and slightly sweet for taste. After numerous variations of different waffle recipes and using 2 different waffle irons I have now come up with a good working waffle recipe that creates exactly what I'm looking for! The added bonus is that this recipe is super easy to make. It is slightly on the runny side after mixing, but this is needed to create the crispy shell.
Classic Belgian Waffles (makes approx. 8 large waffles)
1 1/2 cups (395 ml) water
2 1/4 tsp (11ml) active dry yeast (or 1 packet)
3 cups flour (sifted)
1/4 tsp salt
3 large eggs, separated and 1 egg white
1/3 cup (75 ml) sugar
1 1/2 cups (375 ml) whole milk (I used 1% for this recipe)
8 tbsp unsalted butter (melted & cooled) 
2 tsp vegetable oil
2 tsp vanilla extract
Directions:
1. Heat 3/4 cup of the water to lukewarm. Safe the rest of later.
2. Dissolve the yeast. Add a pinch of sugar (You can also use honey or maple syrup).
3. Let stand for 5-10 min until foamy in a draft free place (i.e. microwave/toaster oven)
4. In a large bowl sift flour and salt, stir & blend. Set aside for later.
5. When yeast mixture is foamy, add egg yolks, one of the egg whites and rest of sugar to the yeast mixture. Add the rest of the water, milk, melted butter, oil, vanilla. 
6. Stir yeast mixture until smooth (I use the KA to complete step 5).
7. When yeast mixture is smooth, add flour to yeast mixture. Stir until smooth.
8. Beat egg whites until stiff peaks form. Fold into yeast mixture.
9. Let batter stand for 1 hour. Stir every 15 minutes. (You can cover with a cloth or saran wrap. The batter will start rising in the first 10 minutes).
Making the waffles:
1. I am using a Cusinart rotating waffle maker. I've found that placing it on setting 7 gives the waffle a nice warm golden colour.
2. Add approximately 1/2 cup to the waffle iron. Spread mixture. Close iron and turn. If the batter starts bubbling out the sides of the iron, try using less batter on your next waffle.
3. When the waffle iron beeps, flip waffle iron back over and remove waffle.
4. Place on cooling rack.
These waffles are easily frozen, and will stay good for over 2 weeks. Chances are you won't have them in your freezer that long! I usually make a batch and freeze 4 waffles in a large freezer bag. I usually eat my waffles in the morning by lightly toasting in the countertop oven (though we've also have them for supper at times!). My waffles usually enjoy a variation of toppings such as maple syrup, fruit, strawberry jam, chicken stir-fry or whatever your heart desires.

Sunday, March 14, 2010

Comfort Food


Attending the Edmonton Foodie Meetup last week left me inspired to bring my blog back to life. It's still in the works of an overhaul as I'm planning on changing the template, perhaps with the help of danprime it'll get some readjustments in no time. Meanwhile, back to food. With food on my mind and how to make good heartwarming food, I had the sudden urge for eggs. Not just any eggs mind you, but Strathcona Farmer's Market (SFM) eggs - courtesy of Sunworks Farms. Here is the end result. My omelet filled (more like stuffed!) with again, SFM cucumber, slices of tomatoes, aged applewood cheddar cheese & slices of garlic turkey (from the Italian Centre). Looking at the picture again, reminds me that I need to perfect this skill again. The aesthetics is somewhat lacking, but it tasted great. Continuing with my inspiration, as I had several bananas browning away I turned them into my banana bread. This time, it's slightly different than my usual, but we'll have to see once it gets eaten tomorrow. The big loaf is made with 5 bananas, dark chocolate chips and the rest of the ingredients that hold it together. The mini one is my 'test' one. Same ingredients as usual as well as raisins and a cinnamon-sugar crust.