Monday, November 17, 2014
Made in Blog Awards 2014
Hello everyone! The Made in Blog Awards 2014 is here! The Made in Blog Awards are all about promoting Canadian bloggers, so it is a great way to look out for new blogs and content in a range of different areas! If you have the time, please do me a big favour and click on this link HERE, to vote for me in the "Cooking" category. All you need to do is click the blue "Vote for Me +1" button. No registration is required and anyone can vote. You have until November 26, 2014 to vote. After that all blogs with the most votes are then judged by a panel. Thanks so much for the support and I really appreciate it!
Thursday, November 13, 2014
Easy Crustless Quiche Recipe & A Giveaway!
When my husband and I made the Taiwan Red Bean Wheelcakes back in September, we were trying out various recipes that could be used on the Nordic Ware Eggs Plus Pan. One thing that you should know about my husband is that he is a huge proponent on ensuring that every single one of our kitchen gadgets must not be single function kitchen tools (with the exception of a can opener). This means that any kitchen gadget that lives in our kitchen must be able to be used for different recipes.
The first recipe we made with the new pan was actually not the Taiwan Red Bean Wheelcakes but instead Crustless Quiches!
So below is the recipe for the Crustless Quiches. Make sure you read all the way to the end for exciting details on how you can win the Eggs Plus Pan for yourself!
Crustless Quiches
Ingredients- approx. 1 cup of milk
- 4 eggs
- 3-4 filling ingredients such as tomatoes, onions, cheese, spinach etc.. The sky's the limit!
Directions:
- Dice up all the ingredients into smaller pieces as the quiche cooks fairly quickly.
- Beat eggs and milk together in a bowl. Transfer the filling to a bowl with a spout and pour the egg mixture about half-way up each reservoir. Oiling each reservoir beforehand is optional (the pan is non-stick).
- Once the egg mixture begins to cook, slowly add fillings to each crustless quiche. You can even put different fillings in each one and customize to everyone's preferences!
- Cook the crustless quiches on medium for about 10 minutes, or until the tops are cooked and the egg is no longer runny looking.
- Using a silicon spatula gently loosen the quiche from the pan and serve onto a plate.
We tried putting the top on the pan initially, but realized that this would soften the quiches as the pan begins to cook with steam. If you want crispy quiches, leave the top off.
It goes without saying that having individual quiche creations is great. However, you could easily use the pan for multiple uses such as making two crustless quiches, a sunny side egg and sausage all in the same pan. The pan also has a little pamphlet that comes with further ideas on how to use it.
Or, you could always make the Taiwan Red Bean Wheelcakes from my previous post!
Giveaway!
Now for the eggciting part of this post! Nordic Ware has given me an Eggs Plus Pan to give away to one lucky reader! This pan will be shipped directly to you from Nordic Ware and is open to Canada and the U.S! Enter the giveaway in the Rafflecopter below with your details. Make sure you leave a comment as that is the minimum requirement for entering the giveaway. Good luck!Prize: One (1) lucky reader will receive a Nordic Ware Eggs Plus Pan.
Duration: Giveaway will be open until November 30, 2014.
Who Can Enter: Open to residents of Canada and the USA.
How to Enter: Please follow the instructions in the rafflecopter below. Remember that leaving a comment is mandatory.
How will the winner be chosen: The winner will be chosen at random and will be notified via email. The winner will have 24 hours to respond or a new winner will be chosen.
Friday, November 7, 2014
SPUD Delivers in Edmonton & A Brown Sugar Glazed Carrot Recipe
When I was at the Food Bloggers of Canada Conference in Vancouver last month, I met one of the people from SPUD. SPUD is a grocery delivery service which focuses on sustainable and organic produce. When I talked to Julia, the Communications Manager for Vancouver, she mentioned that SPUD Edmonton had just launched so I was more than excited to try it out.
When you sign up for the SPUD service on their website you can pick and choose what types of produce, meats, snacks, dairy, fish and more that you want delivered in your box. Our box featured their Fresh Harvest Box. Once you order your box they let you know which day your box will be delivered. For us, we were told that our SPUD box would be delivered on a Tuesday between 3pm and 9pm. Granted, the time frame is very wide which makes it difficult for someone to be home during that time period. Thankfully, you are able to put in special instructions and/or indicate a safe place for them to deliver your box.
We were super excited to open our box when we received it. All of the produce including the veggies and fruits looked fantastic and fresh. Care was even taken to ensure that the tomatoes would not get crushed as they were placed into a paper bag. There is also a divider in the box to help keep produce in place.
If you want to try SPUD out they have a great discount where if you buy $60 or more you will get $40 off your first order before November 15, 2014! Just use my special code CREDM-ZZZLIL or click here.
SPUD is also in other cities! So if you are in other cities in Canada such as Calgary, Vancouver & area or Victoria to Nanaimo, you too can take advantage of their services. They are also in San Francisco & Bay Area and Los Angeles & Orange County in the States.
With the great produce that we got, I decided to use the carrots in a dish to highlight how fresh they were.
Brown Sugar Glazed Carrots Recipe
Ingredients:
- 2 lbs of carrots
- 1 cup of water
- 1 tablespoon of butter
- 1-2 tablespoons of brown sugar
- pinch of salt
Directions:
- Wash and peel the carrots.

- Cut the carrots with a sharp knife into even pieces. This will help them cook evenly.

- In a large pot add 1 cup of water, butter, brown sugar, a pinch of salt and the cut carrots. Turn the temperature up to high. Once the water mixture begins to boil, stir the carrots and turn down the temperature to a simmer. Place the lid on the pot for 6-7 minutes.

- Using a flat spatula gently stir the carrots around until they are soft enough to eat. Serve & enjoy!

Tuesday, November 4, 2014
Home made Pumpkin Spice Macaron Recipe and Answers to Common Questions
If you have been following along with me on twitter & Facebook, you will know that it has been a busy few weeks! First, in mid October I had the most amazing opportunity to travel to Vancouver to attend the Food Bloggers of Canada Conference where I met lots of fellow food bloggers, ate delicious meals and networked with several brands (more on the conference in later posts!). I have also been baking a lot of macarons lately and recently have been teaching macaron classes! So, today's post comes from one of the macaron classes that I did this past weekend. Seeing that we are still in the season, the two ladies decided on making pumpkin spice macarons!
The recipe for the pumpkin spice macarons are actually covered in my Macaron 102 and Macaron 103 posts, so head on over to those two posts for the step by step directions. Also, if you haven't seen my post for making your own pumpkin spice make sure you take a look at that one as well!
I often get asked about what is involved with learning how to make macarons.
Location?
You can make macarons in the comfort of your own kitchen! Over the past 3 years I have tried and tested many macaron recipes in a apartment kitchen with no special ovens. Lately, with the houses I have visited to make macarons I have brought along a simple oven thermometer ($5) to keep the baking temperature consistent. So, it goes without saying that you CAN make macarons in your home kitchen.
Special Equipment?
I have found that heavy baking pans (also known as heavy commercial jelly roll pans) are essential for making macarons.
I also use a stand mixer such as a Kitchen Aid in order to beat the egg whites quickly and consistently. However, if you are comfortable doing this by hand such as using a whisk or a hand mixer it is possible.
A silicon baking mat (e.g. silpat) is nice to have, but not essential for baking macarons. You can use parchment paper.
For other equipment and ingredients that you will need, please read my Macaron 101 post.
Do I need any special skills before trying to bake macarons?
No, you do not need any special baking or pastry skills before trying to make these delicious treats! The mixing process (also known as the macaronage) requires special attention to ensure that you do not over or under mix. Lastly, piping same sized macaron shells can be tricky at first but practice makes perfect! Each batch of my macarons produces around 60 shells so you will get lots of practice!
How much time do I need?
I tell my friends who want to learn, that it takes at least 4-6 hours for their first batch of macarons. This is mainly due to the time it takes to prep the ingredients, mix, pipe, resting time, bake and fill the macarons.
As well, what surprises many people is that the best time to eat and enjoy a completed macaron are after they have rested in the fridge (in an airtight container) for 2 whole days!
How long do homemade macarons last?
I typically freeze a portion of my completed macarons in the freezer and they are good for a month in an airtight container. The macarons in the fridge will usually stay fresh for about 5 days or 1 week after filling.
When you are ready to eat the macarons, take them out of the freezer and keep them in an airtight container to defrost for at least 2-3 hours. Ensure you keep the lid on the macaron container while they defrost on the counter at room temperature.
My intention for this post is to show that macarons can be made at home. I was extremely happy that I had the opportunity to share my excitement for making macarons with some new friends! Please post any questions that you might have in the comments below!
Thursday, October 16, 2014
Passion Fruit Chocolate Macarons - Step by Step Recipe
I am about to head out to the Food Bloggers of Canada Conference , so before I am off I thought I would share a new macarons recipe that I have been working on. The first time I made these, I used a very dark chocolate which ended up being too bitter and made it hard for the passion fruit flavour to come through. This time, I used Valrhona Manjari 64% chocolate recommended by Jacqueline Jacek that I had picked up while at the Jacek Chocolate 104st opening back in August. I am much happier with this chocolate passion fruit ganache and the macarons taste way better this time round!
Passion Fruit Macaron Shells
Directions:
- To know what equipment and materials you need to make macarons, visit my Macaron 101 post. Then, follow with my Macaron 102 post for learning how to make the macaron shells.
- The only difference is that you will need 2 drops of yellow gel food colouring and 1 drop of red gel food colouring for the passion fruit shell colour.
- After the shells have been baked and cooled, prepare to make the passion fruit chocolate ganache.
Passion Fruit Chocolate Ganache Filling
Ingredients:
- 200g Valrhona Manjari 64%
- 200g cream
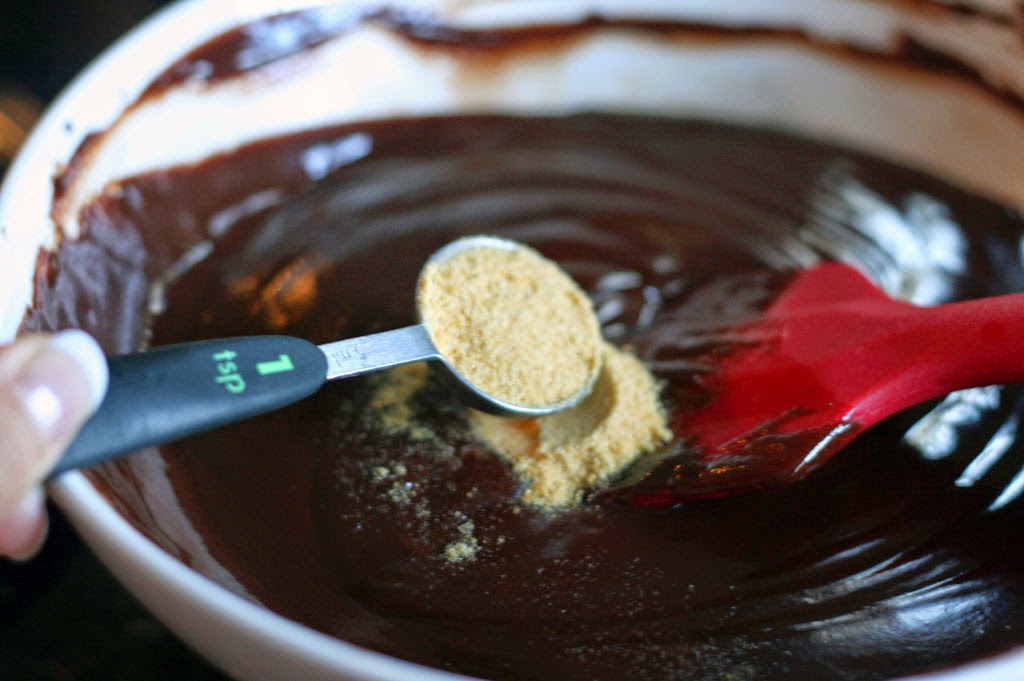
- 1-2 tsp of freeze dried passion fruit powder
Directions:
- Measure out all the ingredients. Roughly chop the chocolate pieces with a serrated knife.

- Set up a double boiler and melt the chocolate. Meanwhile in a another pot bring the cream to a boil. Use a whisk to prevent the cream from sticking to the base of the pot. As the chocolate melts use a spatula to stir. The chocolate should all melt in about two or three minutes. Once the chocolate has melted completely remove the bowl from the double boiler and stir until smooth.

- Pour the hot cream in thirds into the centre of the bowl and stir until the consistency of the ganache begins to thicken.

- Whisk from the sides of the bowl in wide circles. It should gradually thicken.

- Add in the freeze dried passion fruit powder to the chocolate ganache.

- Pour the ganache into a gratin dish using a spatula. Cover the ganache with saran wrap so that the saran touches the surface. Allow the ganache to cool completely before placing it in the fridge and it is thickened.

- Match macaron shells by size, then pipe a small mound of passion fruit ganache onto each half shell.

- Top with the remaining shell and give a slight twist to secure the macaron together. Allow the macarons to rest in the fridge for two days or freeze them before you enjoy them. Trust me! They will taste way better!

Do you think you will try making these Passion Fruit Chocolate Ganache Macarons? If no, what other flavours do you have in mind?
Monday, October 13, 2014
Rocky Mountain Wine & Food Festival is Back for 2014!
It's that time of the year again! The Rocky Mountain Food and Wine Festival is back and I have a pair of tickets to give away to one winner for Saturday October 25 afternoon tasting (12-4pm) in Edmonton.
To be entered into the contest you need to do ALL of the following:
1) Live in Edmonton or vicinity.
2) Be able to attend the Saturday October 25, 2014 12-4pm session
3) Like my Beyond Umami Facebook page (https://www.facebook.com/beyondumami )
4) Check my Beyond Umami Facebook page for more info. (https://www.facebook.com/beyondumami/posts/478640338944379).
Contest closes Thursday Oct. 16, 2014 midnight MST, please check my Beyond Umami Facebook page on Friday Oct. 17 to see the results!
One randomly selected commenter will be chosen to win the tickets.
Please note, that the tickets are just for entry into the Festival and have no monetary value. Food & drink tickets need to be purchased separately. Must be over 18 to attend.
To be entered into the contest you need to do ALL of the following:
1) Live in Edmonton or vicinity.
2) Be able to attend the Saturday October 25, 2014 12-4pm session
3) Like my Beyond Umami Facebook page (https://www.facebook.com/beyondumami )
4) Check my Beyond Umami Facebook page for more info. (https://www.facebook.com/beyondumami/posts/478640338944379).
Contest closes Thursday Oct. 16, 2014 midnight MST, please check my Beyond Umami Facebook page on Friday Oct. 17 to see the results!
One randomly selected commenter will be chosen to win the tickets.
Please note, that the tickets are just for entry into the Festival and have no monetary value. Food & drink tickets need to be purchased separately. Must be over 18 to attend.
Thursday, October 2, 2014
Aubergine (Mock Apple) Crisp Recipe with Oats
Ever since we tried the brilliant "aubergine tart" at Teatro my husband, Danprime and I were inspired to do create something similar. The aubergine tart tasted like an apple pie but instead of being made of apples it was made with eggplant! After doing some research we found that this type of tart is referred to as a "mock apple pie". Typically, these recipes involve strange ingredients like zucchini or even soda crackers but there were none that used eggplant.
The key to making good mock apple pie is to not over cook the eggplant and to only use the firmest parts. Sprinkling salt over the slices will draw out the moisture and some of the bitterness associated with overcooked eggplants.
Aubergine (Mock Apple) Crisp Recipe with Quick Oats
Ingredients
- 2 Medium-Large Firm Eggplants
- 3 Tbsp of Lemon Juice
- 3/4 Cup of Brown Sugar
- 2 tsp of ground Cinnamon
- 1 tsp of ground Cloves
- 1.5 tsp of Cream of Tartar
- 1/2 Cup of water
- 2 Cups of Quick Oats
- 1/2 Cup of Melted Butter
- 1/2 Cup of Brown Sugar
Equipment
- 1 Large Baking Pan
Directions
- Peel the skin off the eggplants.

- Cut each eggplant into 2 cm or 0.5 inch slices. Ensure that you have cut away the seed and "soft" flesh from the inside of each slice of eggplant in order to only use the very firm parts of eggplant. Sprinkle the slices with salt.
Wait 30-40 minutes for the eggplant slices to "sweat" water (this process helps to remove some of the bitterness found with eggplants).
- Mix 3/4 cup of brown sugar, cinnamon, cloves, cream of Tartar together in a separate bowl. Set aside.
- With a paper towel, wipe the moisture off the eggplant slices.
- (Optional) Set aside half a cup of the firmest parts of the eggplant slices.
- Cut the other eggplant pieces into "apple-like" chunks and slices. Then mix 3 tbps of lemon juice into the eggplant pieces.

- Cook the lemon-covered slices in a large skillet for about 5-8 minutes.
- Pour the skillet's contents into the large baking pan.
- Pour half a cup of water into the baking pan along with the cooked eggplant pieces.
- Sprinkle the brown sugar mixture over the top of the eggplant slices.
- (Optional) Add the firm pieces of eggplant that you set aside earlier into the baking pan with the cooked eggplants. These firm pieces will provide an extra "apple-like" crunch.

- Mix the Quick Oats, Butter, and 1/2 cup of brown sugar in a separate bowl to make the topping. Then sprinkle the topping over the the eggplant slices.

Baking Instructions
Notes:
- Over-baking can cause eggplants to reveal their "true" nature and flavour.
- Remove as much of the soft insides of the eggplant and seeds as that will remove a lot of the bitter flavour of eggplant.
- The firm parts of the raw eggplant should "feel" like cutting apple slices.
- It won't completely taste like apple crisp but some ice cream will help keep the illusion going.
- Using melted butter along with the oats helps to create a more tender topping with a little crunch. An added benefit is that while the crisps bakes the beautiful oat topping for the crisp stays in place and crisps on top.
We served this dish recently to our friends without telling them that the dessert's main ingredient was actually a vegetable. Upon finding out, our friends were amazed and some even said "mind blown!". Needless say that this recipe is a hit! If you make this recipe or if you have made any other "mock" dishes let me know in the comments below.

Subscribe to:
Posts (Atom)